Lessons from the Pastry Kitchen: Gluten Free and Vegan Baking
- piketoplate
- Apr 5, 2022
- 10 min read
Updated: May 13, 2025
When I finished culinary school in June of 2021, I couldn’t wait to take all of my newfound knowledge and share it with my clients. One of the major goals for every class is that people leave my kitchen with at least two or three new nuggets of wisdom that will boost their confidence and inspire them to try new ingredients or cuisines.
Prior to each cooking class, I work with clients to develop a customized menu based on personal food preferences. Over the last several months I have had requests to avoid certain ingredients simply due to aversions. We all have at least one food that we just can’t stand. For me, that’s lima beans. I thought I might grow to like them as an adult, but nope, they still taste like dirt. I’ve also had to accommodate various dietary restrictions. It’s been easy to leave cilantro out for the folks with that genetic profile or avoid shrimp for those with a shellfish allergy. However, I was feeling increasingly challenged when customers requested a gluten-free or plant-based menu, particularly when it came to dessert. Sure, I can make a mean flourless chocolate cake or a delectable rice pudding using non-dairy milk, but I didn’t want those to be my only options. I decided that I needed to take a deep dive.
In January, I returned to South Seattle College to do some independent study with a focus on gluten free and vegan baking. Pastry Chef Holly Odegard agreed to sponsor me for the quarter. Every Monday morning, I spent 5 hours in the kitchen making sweet treats, taking detailed notes, and learning about new ingredients. After 12 weeks of trial and error, I’ve added some techniques to my toolbox and some recipes to the Pike to Plate repertoire. Here are some of the important lessons that I’ve learned.
Lesson 1: Beware of ingredient substitutions
While searching for recipes that are scaled for 6-inch cake pans, I came across a recipe for a red velvet cake. I didn’t have enough food coloring to make this classic cake its characteristic red color, but that wasn’t really my focus when I set out to test the recipe. I simply wanted to make a good chocolate cake.
Since the recipe was not at all complicated, I decided to make two versions. For the first cake, I followed the recipe exactly as written. The goal for the second cake was to make it plant-based. I subbed the egg with Bob’s Red Mill Egg Replacer and for the buttermilk, I added lemon juice to almond milk. No other variables were manipulated. I baked both cakes in the same oven and at the same temperature.


Left image: the standard cake is on the left. Right image: the standard cake is on top.
As you can see from the photos, these cakes were markedly different. The standard cake rose beautifully. The texture was light and airy. The edited version, however, took longer to bake. It had a denser texture comparable to a slightly underbaked brownie. There was something a bit off about the mouthfeel and flavor. While the standard cake was still quite moist the next day, the plant-based version’s texture deteriorated even more. It’s a bit hard to describe, but it was thick and sticky requiring a glass of milk to wash it down and get it off of my tongue. Yuck. The takeaway from this test is that there is risk involved when swapping out eggs and dairy for plant-based alternatives. I’m not saying it won’t ever work, but you may end up with a very different result than what you have in mind. I highly recommend testing the recipe before guests show up at the dinner table.
Lesson 2: Source the recipes wisely
There are a bazillion food blogs here on the worldwide web. For every 10 blogs, I would venture to say that only 1 or 2 have well-written and properly tested recipes. I know this might sound harsh, but it seems that there is more focus placed on food styling and the hope of becoming the next internet sensation than delivering a quality recipe. Because of this, Chef Odegard and I were both a bit hesitant to try plant-based recipes written by bloggers. However we found a few sites that seemed to be quite popular and the recipes had a lot of positive reviews.
Well, out of the three recipes I tested from these blogs, all of them went straight into garbage after just one bite. One was a pistachio panna cotta. Oh how I wish I had taken a photo! It looked as though peas had been added to wallpaper paste. Do I really need to tell you about the taste? Another recipe attempted to mimic an ermine buttercream, which is one of my favorite cake frostings. As I watched it whip in the bowl of the Kitchen-Aid, I made a wish that it was going to taste better than it looked. It only took one small spoonful to know that this was one wish that was not going to come true. The frosting, made with coconut oil in lieu of butter, was an oily, grayish, flavorless goop. The other recipe was for chocolate cake. While it wasn’t as gross as the panna cotta or frosting, the texture was so off that one of the people who sampled it asked me, “What’s this supposed to be?”
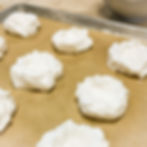
After these debacles, I turned to more reliable sites. I had great success with the chocolate frosting recipe from Minimalist Baker. It’s made with plant-based butter, which is essentially margarine. It’s no wonder that I like it because it reminds me of the cake frostings of my childhood since we rarely ever had “real” butter on hand. The other glorious discovery was Alton Brown’s recipe for meringue using aquafaba. As you can see from the photos, the meringue was light and glossy. Not a single taste tester could detect a difference between this meringue and the one made with eggs.
Lesson 3: Find the right flours
I never realized that I would learn so much about flour until I took a deep dive into gluten-free baking. Even now, I feel like I still have so much more work to do to fully understand the whys behind flour choice. Before starting school, the only gluten-free flours I had in my cupboard were almond flour, rice flour, and masa harina. I also had some tapioca starch on hand since it’s called for in some Asian dishes. Fast forward to now and you’ll find a number of other flours in my cabinet - buckwheat, sorghum, brown rice, and chickpea. I also added potato starch, flaxseed meal, and xanthum gum to my ingredient arsenal. While this selection is adequate, it’s by no means complete.
For the first few weeks of school, I experimented with two different flour blends. I used a recipe that Chef Odegard referred to as the Secret Blend, which contains a combination of rice flours, tapioca starch, and arrowroot starch. I also used Cup4Cup, which was developed in the Thomas Keller test kitchen. What I found interesting is that when I baked cakes using these two blends, there was no consensus among the taste testers as to which one was the best.


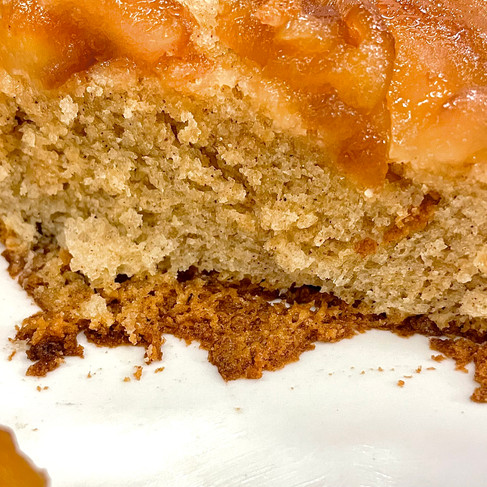
The cake on the left was made with the Cup4Cup. The cake on the right used the Secret Blend.
Case in point, was the Apple Upside-down Cake by America’s Test Kitchen. While the testers noted that the texture of the cake using the Secret Blend was slightly more dense, no one detected any real difference in flavor. Both cakes were very well-received. I was actually quite relieved by this because the batters were very different. The Secret Blend batter was light and fluffy, whereas the Cup4Cup batter was sticky, almost taffy-like. If I did have to choose which one to keep on hand, I would likely go with the Secret Blend for two reasons. First, it’s much more affordable to make a batch of it because the flours used to make it can be bought in bulk. Second, I can use it for plant-based recipes, unlike Cup4Cup which contains a small amount of milk powder.
I then moved onto some recipes that called for other types of flours. Going back to Lesson 2, I went straight to two cookbooks, Cannelle et Vanille Bakes Simple by Aran Goyoaga and Gluten-Free Baking at Home by Jeffrey Larsen. What a goldmine of great recipes! The big difference I found between the two cookbooks was that Larsen tends to use more types of flour in a single recipe than Goyoaga. I still don’t fully comprehend why so many flours are needed for just one cake. It could be that each flour has its own hydration rate and protein content. For example, buckwheat flour comes in a 15.1 grams of protein per serving, while sorghum flour has only 8 grams per serving. This difference could certainly have a noticeable impact on the texture of the cake.

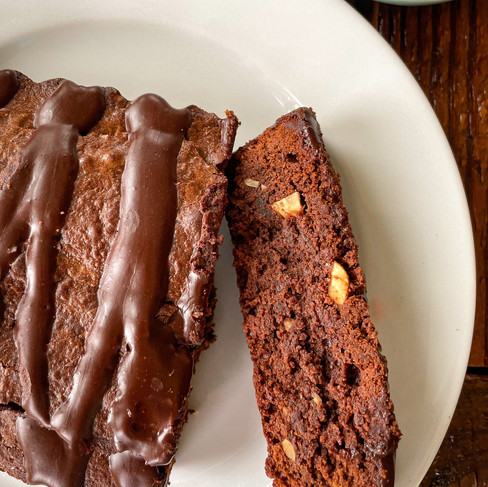


Chocolate Hazelnut Tart (Larsen) and Coriander-Cornmeal Cake with Honey-Candied Lemon (Goyoaga)
The bottom line is that when going gluten-free, one needs to be prepared to have a lot of different flours on hand. Rather than looking at it as an annoyance, it’s really just like taking on any new type of specialized cuisine. I recall the big shopping spree at the Asian grocery store when I decided to go all in with Sichuanese cuisine. Once the pantry is stocked with the essentials, you’re ready to make it happen. You also learn over time what you really need to keep on hand in order to crank out the recipes that you keep coming back to over and over again.
Lesson 4: Got Milks?
Flour is not the only ingredient that has tons of choices. The non-dairy milk shelf is also full of alternatives in both the refrigerated and non-refrigerated section of the store. During my time in school, I avoided soy milk due to soy allergies in the test kitchen and I purposefully left out milks that are cost prohibitive. For all of my testing, I used almond, coconut, and oat milks. Using these three products, I made three plant-based recipes: pastry cream, lemon curd, and Arabic milk pudding. The results were quite eye opening.
Let’s start with the pastry cream. The coconut milk failed miserably. The adjectives to describe it included bland, pasty, and grainy. One tester said, “… it’s like licking an envelope.” I should note that I used coconut milk from a carton rather than from a can, so there is the lingering question of whether or not it could have been better. Thankfully, the almond milk and oat milk showed more potential. People preferred the flavor of the pastry cream made with almond milk, but the texture of the one made with oat milk. I ran out of time to continue testing this, but I do intend to come back to it to see if I can eventually nail it down.
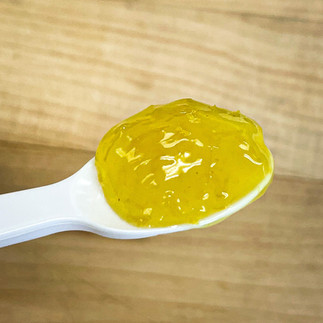
I then moved on to lemon curd. For this recipe, the coconut milk won out. It had the best flavor, color, and texture of the three. The oat milk came in a close second, but it’s texture was more jello-like. The almond milk failed in all respects. It was gloppy and had an odd grayish tint. Unfortunately, I didn’t realize that my photo of the almond milk version was so blurry until I got home, but maybe I’m doing you all a favor by not having you witness its odd hue. I think it’s worth mentioning that this lemon curd recipe is really nothing like standard lemon curd. To me, it’s reminiscent of the lemon filling in a grocery store lemon meringue pie. However, I think that when paired with the right accompaniments, it could be very good.


Left: the winner made with coconut milk; center: made with oat milk; right: the almond milk loser
One of my absolute favorite recipes of the entire quarter was Arabic milk pudding (mehalabya). The recipe calls for a combination of whole milk and heavy whipping cream. In order to compensate for the fat of the heavy whipping cream, I used my favorite canned coconut milk, Chaokoh. Since I was already using coconut milk, I only made two batches of the pudding, one with almond milk and the other with oat milk. The almond milk was the clear winner in this experiment. Another student happened to make the standard version of this recipe the same day and testers had a hard time discerning between that one and the almond milk “imposter.” The texture was divine and the color was on point. Fortunately, the oat milk was good enough that if someone was vegan and had a nut allergy, I could still feel good about serving it to them.
I only tested these three recipes and there was no clear winner when it comes to non-dairy milk. Most of us don’t have enough room in the fridge for multiple cartons of milks. Not only that, if you’re reaching for one here and one there, spoilage is bound to occur. So if we could only stock one, which would it be? I’m afraid I don’t have a clear answer to that question. I feel like almond milk is likely the most reliable choice (and America’s Test Kitchen tends to agree), but if you’re also worried about environmental impacts, then the situation becomes more complicated. 80% of the world’s almond come from California, which has been dealing with ongoing drought. Almonds require tons of water putting a tremendous amount of stress on an already stressed ecosystem. Coconut milk also has its own set of issues, from habitat destruction to human exploitation. Oat milk seems to be the best choice from an environmental standpoint, but the results in the kitchen were ho-hum. Perhaps it’s just like any other product that we decide to use. We need to do our homework and find the one that offers a balance between delivering a good dish and being sustainable.
Lesson 5: There is so much more to learn
The 12 weeks in the pastry kitchen went by fast. When I wasn’t testing at school, I was also testing at home. I still have more questions than answers, but it was time well-spent. I feel much more comfortable now when someone signs up for a class and they request a gluten-free or plant-based meal. It makes me feel good that I can offer more than just another flourless cake or rice pudding because dietary restrictions should not limit people from having great food and plenty of choices. I still have so much more to learn and many more recipes to test, but one of the joys in life is seeking new knowledge. It’s even more fun when it happens in the kitchen.